
I always tweak my photos a little before scrapping and I love the brightness and contrast sliders as they are so easy to use. But lately, my favourite technique is to use blend modes to create dramatic looking photos and it is much easier than it sounds!
(Not tested in PSE yet..sorry)
Firstly duplicate the photo layer twice and then delete the original (background layer) as this can't be edited.
Then play around with blend modes, opacity, brightness, contrast, saturation, curves and see what effects you can create! Here are 2 simple examples to get you started:
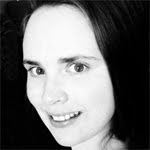
The first photo in the examples below is my original... I love this shot of DS but it is a little bit dull.
The second shot shows a moderate contrast increase. The bottom layer is untouched and the top layer has been changed to SOFT LIGHT at 100%. The SOFT LIGHT blend mode slightly darkens the dark areas, and slightly lightens the light areas. The top layer is blending with the bottom layer to create this.
The next shot shows a dramatic change to the original photo. I have greatly increased the brightness and contrast of the bottom layer (you can just see in the layer thumbnail how bright it is), and the top layer is set to MULTIPLY at 100%. The MULTIPLY blend mode greatly increases the dark areas of your photo, while leaving the light areas almost as they were. This gives the edges and dark areas a lot of contrast.


 Now in both of the examples his eyes have gone very dark, and they are usually a bright blue. So I'm going to use blend modes to fix them!
Merge your layers (LAYER>MERGE DOWN or LAYER>MERGE VISIBLE).
Firstly you need to lasso the iris. Go slowly and and do a little bit at a time if you need to. Hold SHIFT to add to the selection, hold ALT to take away from it.
Now with both eyes selected, click LAYER>NEW>LAYER VIA COPY. This will put the eyes on a separate layer so you can play with them as much as you like! Now play with the blend modes, brightness, contrast, saturation, and even hue if the colour isn't what it should be (or you want to change the eye colour).
In my example I increased the contrast slightly, increased the saturation slightly and set the blend mode to LIGHTEN at 54%.
 Blend Modes are heaps of fun to play with, and you can create amazing effects with them, but they can be very frustrating if you don't understand what they do. For instance some affect light areas, others affect dark areas and some affect both...and they won't all work for every photo.
For more information about what how the blend modes work...here is some good, but complicated info. Trial and error is probably easiest if you are starting out! lol


No comments:
Post a Comment