Showing posts with label template. Show all posts

Monday, February 8, 2010

New from Jazzmin + FREEBIE!!

Jazzmin Designs and Joyce Paul Designs have teamed up to create an absolutely
stunning kit called My Love.
My page is about my friend Christina whom I haven't spoken to in years now. I miss her but every time I try to contact her I get no response. I miss you Christina and I hope you are happy. Congrats on your little one...mwah.

Anyway I loved my page so much I made it into a template.
Click the pic to download...have a nice day! :)


Wednesday, June 3, 2009

Wave Template FREEBIE!

As promised (a little late) here is the wave template I used for my LO 'Go Your Own Way'. But I couldn't stop at just one, so there are actually 6 different wave shapes in here! Mix and match them to create double sided waves...enlarge them to make less of a wave, drag them off the page slightly to create a skinnier wave, or if you need a thicker wave...just select the extra space and fill it with the paint bucket twice to add to the mask.
CTRL-G to clip the paper onto the template.

These templates are personal use only...however you can make quick pages and page templates with them to share as freebies. Please credit Eryn's Scraps if you do :)

And for my own credits...these templates are all made with Sweetmade brushes. Thankyou Aneta :)

Enjoy :)

Melissa's June Template Challenge +FREEBIE!!

It's June and Melissa has come up with another beautiful template for her challenge! The template is free and can be downloaded without registering for The Scrap Addicts...so come and grab it here!

ALSO...if you make a LO with it, come and post it in the forum to receive Melissa's gorgeous mini kit!And my Lo using the template and Melissa's Playtime freebie...

Sunday, May 31, 2009

Melissa's Templates - FREEBIES!

I'm a bit late posting but oh well...better late than never!
So for SA's Birthday Crop a couple of weeks ago, my good buddy Melissa made some cool template freebies! A gorgeous LO template and a cute little bird! Here is my LO made with the template and you can find links for them on Melissa's Blog. :)


Sunday, April 26, 2009

Tutorial: Rounded Corners + FREEBIE!

So I want to round the corner of my photo...such a simple thing in paper as I'm sure everyone has a corner punch!! But how to do it digitally?
I have done it before and it was a PITA..so tonight I made a simple template to make rounding corners of photos and papers much easier!

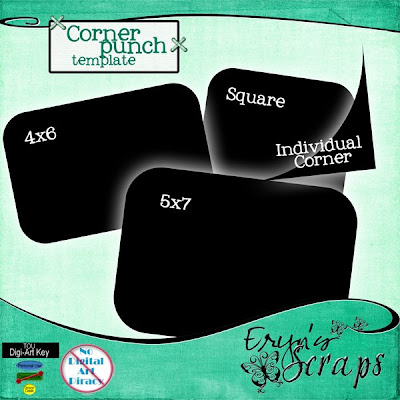
Firstly download my templates HERE.


Now I made 2 types of templates...rounded photo templates in 4x6, 5x7 and square, and also an individual corner template.

For the full photo template, just drag into your LO underneath the photo layer, resize to fit your photo and then clip your photo to the template (CTRL-G). Make sure the photo layer is selected and above the template layer when you clip.


To use the individual corner template, drag it into your LO and resize to fit your photo.
The template needs to be exactly on the corner of the photo so we need to align them. Group the 2 layers (click the group checkbox).
Then choose the move tool and you should see the align tools at the top. Click the top/bottom and right/left to correspond with the correct corner to align both edges.


Now select the corner template (CTRL-click the layer). This should give you the marching ants around the corner. Now click on the photo layer and hit delete. LAYER>DESELECT and turn off the corner template (click the eye) and you should have a nicely rounded corner!
This template allows you to round papers or photos that do not fit the pre-sized templates, and also allows you to round only some corners.

Thursday, April 23, 2009

Cute little house - TEMPLATE FREEBIE!

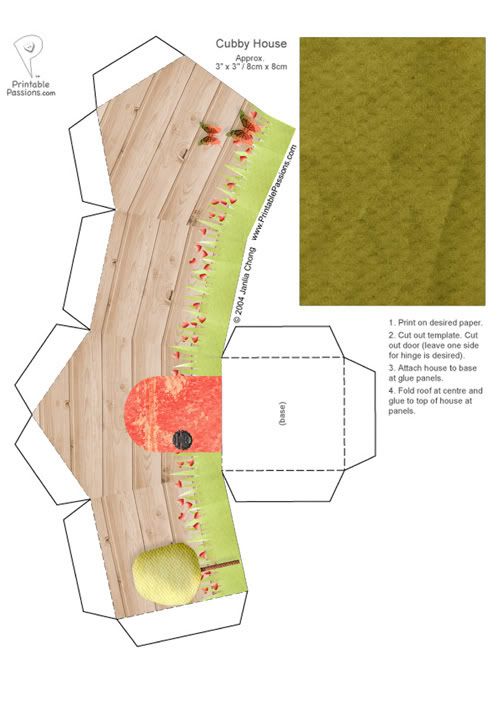
Reading through the Little Dreamer Designs blog recently I saw this gorgeous little house made by Carolee, made from a template at Printable Passions. I was inspired to make one and post a challenge for it at the Scrap Addicts...but when I went to make one I decided it would be much easier if there was a digital scrapbooking template for it. So I made one! Feel free to download my template, made and shared with permission from Janlia at Printable Passions.
All you need to do is open the layered template in your program and clip your papers and elements to the template. Then print, cut and assemble as normal. For more instructions you can check out my Template Tutorial.

DOWNLOAD MY TEMPLATE HERE.

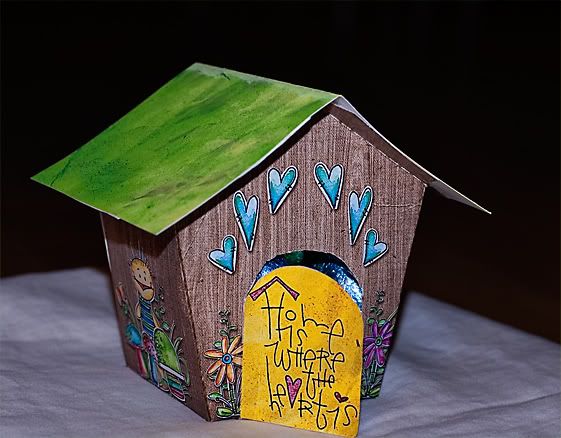
Here is the house made by Carolee from the Little Dreamer Designs blog:


And here is my house so far...so that you can see what it will look like before printing (papers/embellishments not included in template):
Credits: Delicate Spring kit at Digital Crea

Sunday, April 5, 2009

Tutorial: Template Tutorial + Freebie

Congratulations to Melissa for joining the Scrap Addicts A-Team! For her first challenge she has created this fantastic template which is available here.


Now due to some confusion and some of our digi gals being unsure as to what a template is, I decided to write a tutorial. I hope this will be helpful to anyone who has not used a template before :)


A template is the digital equivalent of a 'sketch' BUT...it is even easier to use!

After downloading and unzipping you need to open the 'layers' file in your program. This will be the .psd or .tiff file. I will be using Melissa's template for my examples.

There are 3 components of a template - the paper/photo layers, the element layers and the text layers.


Drag in a paper from a digital kit and in the layers palette, you need to move it to directly above the layer of the template you want to use.


Now hit CTRL-G. This will clip the paper to the template layer so that it is the same size and shape.


If you like, you can move, resize, rotate the paper to get the best part showing.
Repeat this for every paper layer and the photo/s layers.


Okay...elements.

The elements can be used as above if you like what Melissa has made, but they are intended to suggest where you might like to put your own elements. So drag in what you like, put it in the spot and then delete or 'turn off' the corresponding template layer.


Now the text. Click on the text layer, click on the text and delete Melissas. Write in your own words. You may have to change the font if the one used is not on your computer. You can also change the colours, size, and move it on the page if you like.


When you are done...save as a layered file (psd, tiff), then flatten to save as a jpeg.


Feel free to change or add to the template to make it your own. A template is designed to make your scrapping easier, but not to control it!

Also....if you would like to add styles such as drop shadows or bevels, you can add them to the template layer, or you can merge the clipped layers first. To merge the clipped layers, click the top one and then go to LAYERS>MERGE DOWN. This will merge them to create one normal layer that can be manipulated as normal. Have fun scrapping! :D